Saturday, December 27, 2008
I finished some of my previous WIPs this week. In this case, it's a Southern Fire Support Cadre with two demolition drones, which are basically bombs on threads. These all come from the Fire Support Squad box. As soon as I'm done painting it, I'll swap the Jager for an Iguana, for better comms, better survivability and the added benefit of a Target Designator
This is the first of my Spitting Cobras. I like the pose on this guy, even though it makes it difficult for storage and transport.
Second Spitting Cobra
A Support Cobra, with both its Very Light Field Gun (on its back) and Very Heavy Autocannon (handheld). This is actually a downgrade from the basic Spitting Cobra, but I don't think it loses any of its offensive capability, except for the saturation fire capability provided by the Spit's rocket pods.
Some More Work in Progress
I apologize in advance for the poor lighting in these pics.
A standard Hunter
Predator Jaguar
Razorback
Tiger
I'm having a painting Marathon for Northern Gears, it seems...
A standard Hunter
Predator Jaguar
Razorback
Tiger
I'm having a painting Marathon for Northern Gears, it seems...
Thursday, December 18, 2008
New Models
A package of brand new models from DP9 came in yesterday, as if I didn’t have enough to paint already… But hey, how could I resist?
Here are just a couple things I put together before getting on the bus to school.
First, a Python. I love this model. Sure, it’s a crap Gear. Overpriced and much less able than the Southern Spitting Cobra. But it sure as hell looks great. This one is not glued together yet. Both arms, the head and the rocket pod will be glued on later on so I can reach the inner details.
This is a Northern Weasel, a specialist EW Gear. I first resisted buying it because it’s fairly small and very specialized, but I’m glad I finally got it. I just love how it looks, with it’s elongated torso and EW platform. I wasn’t careful while cutting the parts off the sprue so I broke off the left arm at the elbow. I ended up having to put it back together with a paper clip drilled in. I actually really like the way it turned out. The extended elbow gives it a lot of character and makes it look a bit more dynamic.
Wednesday, December 17, 2008
New Painting Projects
I’ll admit I have a bad habit of always starting new projects before I get the old ones done. As it is, my worktable is covered with half-finished models, some of them with barely a basecoat, others a few minutes away from completion. I’m just very bad at staying focused on the things I have already started.
I thought I would describe a technique I started using recently. I used to basically do the basecoats, or at least for the dominant color, and then do a wash to create shadowed areas and make the detail “pop” a bit more. I would then do progressive highlights and finish with the smaller details, with last minute edge highlights on the appropriate areas.
This time, I applied an initial very diluted basecoat, thicker than a wash, but still being sure to have a fairly high level of transparency. Here I used Citadel’s Graveyard Earth. As it dries, it pools in the model’s recesses, it creates shadows and accentuates the perspective. The more elevated areas are left with the white primer showing through, but at this stage there is no need to cover the surface thoroughly.
The next step, after the first colour is completely dry, is to start applying the model’s true base colour. In this case, I am using Reaper Master Series’ Desert Khaki. I leave the shadowed or depressed area clear. If I was in a hurry, I could just dry brush the model at this point and I would still get a fairly decent result. But I’m in no hurry, so I’m taking my time with this one.
Here, you can see two Basilisks I have started using the same technique. Later highlights will accentuate the roundness of the head and legs.
Wednesday, December 3, 2008
Sunday, November 30, 2008
WIP Peacemaker Razoback
Another work in progress sitting on my table at the moment, a Peacemaker Razorback. I'm also putting together a standard Razorback in more sober colours. I have to say, with all those crisp lines, and sharp angles, this is possibly the easiest miniature to paint, yet still manages to look great.
The Razorback is an Assault Gear, but I have no idea how it actually performs in a game. It's a bit slow, and the heavier armor doesn't quite make up for how often you're going to get hit. It does have nice weapons, and the VHAC just looks awesome.
Saturday, November 29, 2008
An Almost Finished Spitting Cobra
This is a picture of an almost finished Spitting Cobra, for a Militia Fire Support Cadre. Some work remains to be done on the gun and the head, as well as adding some extra highlights, but you can get a pretty good idea of the finished mini.
This thing is truly a beast. It's massive, and it's great at projecting an impression of pure brutal force. I have been working on this bastard for about six months.
Work in Progress
A Sidewinder.
A Desert Viper (minus the arms).
A Black Adder.
These are some Gears I am working on these days. These should form another Strike Cadre, this time with Desert colours and with different Gears. You may have guessed I like to work with very a very limited palette, bordering on the monochrome. I also decided to switch to hex bases in the middle of putting these guys together. I just find that hex bases are more "Heavy Gear" than round ones.
Some Accessories for Heavy Gear Blitz!
A Defense Turret with two Heavy Autocannons.
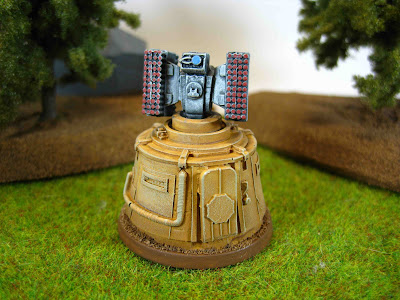
A Defense Turret with twin Heavy Rocket Pods. Those can be placed on the terrain as defensive assets. I believe they are very easy to blow away. It must suck big time to man one of those.
This is a recon drone, very nice gadget used to peek around corners or perform forward observation from a safe distance. I am pretty sure this is the smallest mini I have ever painted. It's about 5mm across.
Militia GP Cadre and Strike Cadre
Here are some Heavy Gear Blitz! minis I put together and painted late last year. Above is a Southern Militia Strike Cadre comprising of, from left to right, a Blitz Jager, two Black Mamba, a standard Jager and another Jager with a LBZK weapon swap. Below is a GP Cadre from the same army, with four Jagers with standard loadout and, in the middle, a Command Jager with a paratrooper rifle.
I love the Heavy Gear minis since the release of the new Blitz! sculpts. They are highly posable, very dynamic, and the arms and weapons are a lot less flimsy than the previous version.
Subscribe to:
Posts (Atom)